Updated for Blender Version: 3.1
What is the Origin?
An object’s “origin” is the exact point in 3D space where that object sits. When you click on an object in Blender, you should see a small orange dot. That is the origin. This point is where all transformations happen in object mode. As you add object primitives to your scene, each one will have its Origin set to the very center of the 3D object. This is great to start with but as you move into edit mode and begin modeling, that origin point stays regardless of the object’s shape. This can cause headaches later on as you go to move or rotate the object as it is still using the old Origin as the pivot point.
Ways to reset the Origin
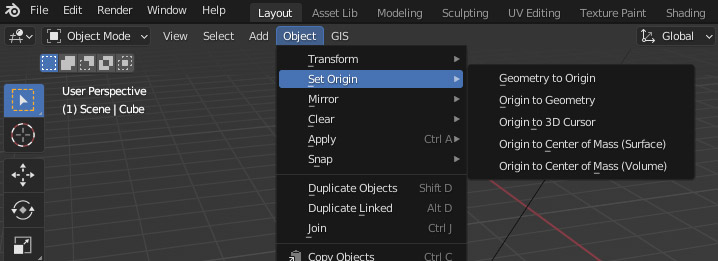
The quickest way to reset an object is to go to Object mode, select the object and go to the menu along the top of the 3D Viewport. Click Object and hover over Set Origin. To move the Origin to the very center of the object, click “Origin to Geometry”. There is also an option to move the “Geometry to Origin”, which will do the same thing though it will move the object geometry itself.
Maybe you don’t want an origin point that is at the exact center of the object. Maybe you want to set it to a specific point. This takes a few more steps but is still simple to do. Let’s take a simple door for example. A door may look complicated, but if you block it out in 3D it is just a cube that is scaled to be very thin and tall to fit a door frame. Likely the origin point is in the very center of the door object. This is a problem if you want to animate the door to make it open and rotate around its hinges.
Select the door object and press Tab to enter Edit mode. Use Edge Select to select the edge that you want the door to swing around (where the hinges would be). Press Shift+S to bring up the context menu and select “Cursor to Selected”. This will move the 3D cursor to the center point on the selected line. After that, Tab back into Object mode and go to Object > Set Origin, and select “Origin to 3D Cursor”. Now you can select the door, press R+Z to rotate around the Z-axis and the door should swing open around its new origin point.

Two common uses for positioning the origin
Positioning the Origin using the 3D cursor is a common technique. As you saw, one of the common uses is to make sure that the hinge-point of an object is in the correct place for animation, like the door in the example above. A similar use would be to use this technique to position the origin along the bottom of an object, like a chair. That would make it much easier to scale the chair up or down without having to reposition it.
Another common example is using the Mirror modifier. By default, the Mirror modifier will reflect the object across its origin. Resetting or repositioning the origin will change where the object is reflected.