
Updated for Blender Version: 3.1
Get to the Point
- In the 3D viewport, press Shift + A to bring up the Add context menu.
- Hover over “Image” and select either Reference or Background. Reference will add the image as a plane object within your scene, edited like any other object. Background attaches the image to the current view (front, top, side, etc.) and is only visible from that view
- Manipulate the images as needed using the S, R, and G keys.
NOTE: Backgrounds and reference images will not appear in the rendered scene. To render an image, try using Add Image as Plane.
It is often helpful to have reference images like sketches or photos to use when starting to model an object. To add a reference image, hit Shift + A to bring up your Add menu. Scroll down until you find the Images tab. When you hover over it, you will see two options: reference, or background. A Reference image is an image that is visible in the scene and can be moved and manipulated like a plane.
The Background image option is similar in that it adds an image and can be scaled, rotated, and moved with the S, R, and G keys, but it is only viewable in the top, front, or side views of the scene. Toggle through the views using, 1, 3, and 7 on the numberpad.
NOTE: When rotating a Background image, be sure to include the axis as well as “90” to rotate 90 degrees. Alternatively, with the Background image selected, press N to pull up the Transform tab, which shows the object’s Location, Rotation, and Scale.
Background and Reference Image Settings
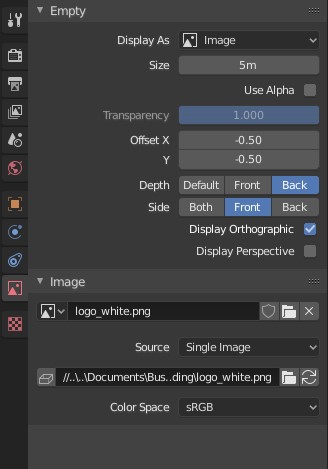 To find the settings for the Background or Reference image, select the image and click the red picture icon in the panel on the right side of the screen. This tab is an “Empty” tab because the image is added as an Empty – essentially a placeholder, point of reference, or other non-rendered object.
Checking Use Alpha will give you the ability to adjust the transparency of the image, which can be useful for overlaying blueprints or floorplans over your model.
The top dropdown labeled Display As will change the type of object that represents the Empty. The Size and Offset settings are basic scaling and positioning settings.
The Depth setting determines if the image will always display in front of or in back of the object. The Default setting will treat the image the same as any other object and adjust its visibility based on its position in the scene.
“Side” will set the direction from which the image is visible: only visible from the front side, only visible from the back, or both.
The Orthographic and Perspective checkboxes toggle which views the image is visible in.
In the section below that, you’ll see the option to change the image file if needed. The Source dropdown gives a few image type options, including Movie.
The bottom file field is the “pack” option, which will “pack” that image into the .blend file, essentially duplicating it, storing it and referencing it within that .blend file. If that particular image ever moves or is deleted from your machine, Blender will always know where to grab that file – the copy within the .blend file itself.
Reminder: the Background or Reference image will not be rendered with your scene. There are other ways of adding renderable images to a 3D scene.