Updated for Blender Version: 3.1
To the Point
- Select an object and add a material to it.
- In the Shader Editor panel, press Shift+A, hover over Texture and select Image Texture.
- Place the node. Click the Open button and select the Normal image.
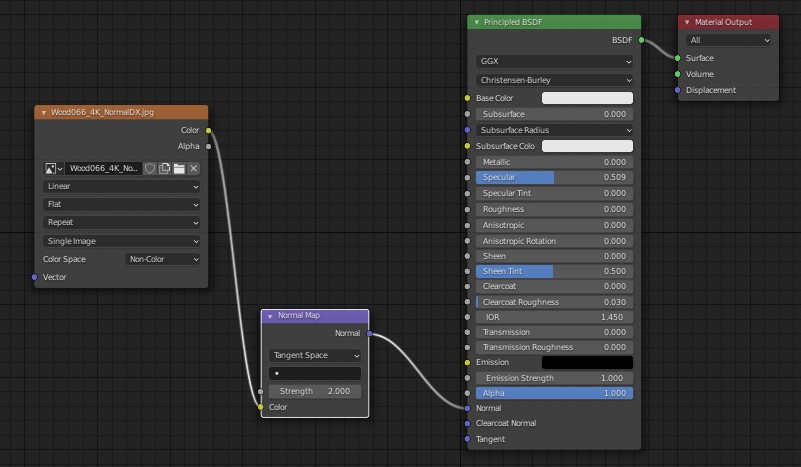
- Press Shift+A again, hover over Vector and select the Normal Map node. Place it between the Image Texture and the Principled BSDF node.
- Connect the Image Texture to the Normal Map node, and then to the Normal input in the Principled BSDF node.
The Details
Using Normal Maps in your 3D materials is a vital step toward adding realism without sacrificing render times. Normal Maps are a way of faking intricate details and shadows on objects without having to actually model all of those details. For example, a Normal Map could be used to create a very realistic-looking brick wall without having to model each and every brick.
Set up a Normal Map
Start by selecting an object and adding a material to it, then open up the Shader Editor panel.

In the Shader Editor, you should see a Principled BSDF shader node already set up for the material. To quickly set up all of your material images with one quick hotkey, use the Node Wrangler quick material setup (this should include a Normal Map). If you want to set up your Normal Map by hand, simply press Shift+A, hover over Texture and select Image Texture. Place the Image Texture node to the left of the Principled BSDF node. Click the “Open” button in the Image Texture node, then find and select your Normal image.
The final step to set up the Normal Map is to add the Normal Map node by pressing Shift+A, hover over Vector, and click on Normal Map. Place this node between your Image Texture node and the Principled BSDF node. Connect the Image Texture to the Normal Map node, and then connect the Normal Map to the “Normal” input on the Principled BSDF node.

Normal Map Settings
Color Space: In the Image Texture node, you’ll see a “Color Space”. Normal Maps should be set to “non-color” to get the best result from that type of image.
Strength: In the Normal Map node, the “Strength” slider is useful for adjusting how deep or shallow the Normal Map appears on your object.
